Tuesday, 24 February 2015

How To Fix RunDLL Error In Windows PC

RunDLL32 is basically a type of error, which occurs due to some corrupt DLL file or an uncompleted installation. RunDLL depends upon the DLL (Dynamic Link Library) files. Well, the DLL files is a wide range of codes and information which is used when you run a program on your PC and these codes also helps programs to run different tasks simultaneously.


The RunDLL32 error can also occurs when the program is not installed completely or the DLL file has been corrupted or infected by some kind of viruses and malwares. So, this is why you see a message saying that RunDLL error has occurred. RunDLL32 error arises when your Windows is unable to open a piece of code or file that is needed to run the program. There are many types of RunDLL errors and all of them can be fixed easily. So, today in this tutorial I will teach you that how you can fix the RunDLL error in your Windows PC. This error also arises when a spyware is installed on your computer. So, without wasting much of your time, let’s get started.

Learn-How To Fix RunDLL Error

To fix RunDLL error in your Windows PC then follow the below given steps.
  • First of all, click on Start button and then type msconfig and hit Enter key on your keyboard.
  • Then, the System Configuration window will appear.
  • Now, in System Configuration, select the Selective Startup option. Now, check on any one option given below the Selective Startup option and remove the check from other options.
  • Then, click on Apply and OK button.
  • Now, Restart your computer.
  • After that, if the error displays about the selected option then it is good and if it doesn’t then try changing the other options in the Selective Startup option till you get the RunDLL error displays for the selected option.
  • Now, when you have got the RunDLL error than try installing an Anti-Spyware or Anti-Malware program to fix the corrupted DLL files. These programs will automatically find any spyware or malware which is corrupting the code or doesn’t allows you to access the program and then removes them completely.
  • If this also doesn’t work then try uninstalling and again re-installing the program.
  • That’s it! You are done!

Monday, 16 February 2015

How To Make Video Calls With Firefox Hello

Video calling is the contemporary  generation’s mode of communication being regularly exploited by millions of people around the globe. Most of the people are customized with Skype, the leading virtual communication service over the internet for video calling along with text messaging interface. Apart from it, many such video calling services are competing with Skype and unfortunately none of them have sustained to attract users. Based on these factors Mozilla rolled out a new update (Mozilla 35.0) with advanced free video calling service on internet named “Firefox Hello” with engrossing features residing user friendly mode of operation.


Mozilla Firefox Organization have launched a new update on Firefox browser with advanced WebRTC ( Web Real Time Communication) feature for the first time and officially named it as- Firefox Hello for Mozilla users by making communication with your friends and family when you bide somewhere else.
Firefox Hello is a lot easier to use which is located as a default option in toolbar in Mozilla browser, all the thing you need is to have a latest updated Firefox browser 35 to avail the new Firefox Hello on your PC/Laptop.

Learn-How to make video calls using ‘Firefox Hello’

how to make video calls with firefox hello
  • Firstly you need to download Mozilla Firefox 35 , if it’s pre-installed on your PC/laptop you can update it to latest version either
  • Click here to download Mozilla Firefox 35
  • After downloading you just click on the .exe file to install/update Firefox browser
  • Click on the toolbar in top left side of you Mozilla browser so that Firefox Hello is visible in the drop down menu list there.
  • If the Firefox Hello button  is missing from your toolbar or menu, check in the Additional Tools and Features drawer first and you can move the Firefox Hello icon to toolbar menu
  • Click on the menu button from the top right corner of the browser.
  • Click  customize to see Firefox’s additional tools and features.
how to make video calls with firefox hello
  • After the customization (if necessary) you can make free video calls or voice calls to your friends and relatives by signing up or logging in to your Firefox account
  • Then you can just send an invitation for your friends for voice call using an invitation link by copying it or even you can share by using Mail
  • You can even change your visibility settings while receiving or sending the voice call invitation link as visible or do not disturb in beta version and you can just cancel or accept the call invitation.
how to make video calls with firefox hello
  • Your friend or the one for whom you send the call request may not have the Firefox and he/they can use any of the compatible browsers like Chrome and Opera which are preferable one to go
  • Need not to log-in and sign-in every time, by simply clicking on the link and can start a video conversation.

Additional features of Firefox Hello which drags user attention

  • Contacts management have been added for the first time to integrate the contact list of your desired one with desired manual input or even you can import from your Google account.
how to make video calls with firefox hello
  • The major benefit of Firefox Hello is that you don’t need an account to make a call. However, if there are people that you connect with regularly, you can all sign up for a Firefox Account. You can initiate calls from your account by choosing video conversation or voice conversation and even block the deplorable contacts
  • Safety and security issues are maintained at high standards where your personal data,information and mail id’s will not be shared any where else.
  • You can check out the brief video on working and usage of ‘Firefox Hello’

How to Speed Up Windows 8 PC to Work Faster – 5 Tips


Do you have Windows 8 installed and are thinking about tweaking its performance? Or have you installed many apps and softwares and now the question “Would this effect the performance and booting speed?” is clicking in your mind. So, you don’t worry about these questions, as today we are going to make you learn that, “How to Speed Up Windows 8 PC?”
Additionally, you are going to make it possible by applying our 10 tips. We are 100% sure that after going through these tips you can easily speed up Windows 8 PC of yours and can make it work faster. Your all works will be done in second and it will simply charge its performance.

Learn-How to Speed Up Windows 8 PC

So, here are the guide which you need to follow to learn that, “How to speed up Windows 8 PC?” You need to apply these 5 tips in order to make your PC work faster and boost its performance. Now, you are suggested to get towards the below steps.

1- Changing Power Settings

This is the most easy Tweak. Just open the Charging Power Settings by accessing the Control Panel and set the option to “Set to High Performance”.

2- Closing Unnecessary Programs at Windows Startup

Now, whenever your computer boots it analyses and reads Startup Programs on Startup. Some Programs get enabled at Startup by default on installing them. Such type of Programs increase the time your computer takes while booting. Take the following steps to disable them on Startup.
  • Press Win + R
  • Type in ‘msconfig’ and press Enter
  • Choose Startup tab
  • Uncheck programs that are unnecessary for loading at Startup
  • Click on Apply and OK
  • It will prompt you to restart
  • Changes will take place once you will restart
Note: In previous Windows versions the startup items list was present in system configuration manager which can be accessed using msconfig command. But Microsoft has moved the startup items list in Windows 8. Now it can be accessed using Task Manager.
  • You can open Task Manager by pressing “Ctrl+Shift+Esc” keys together. Now go to “Startup” tab and here you can click on the unwanted item and click on “Disable” button to remove it from startup list.
  • You can start these programs again by manually selecting them.

3- Registry Cleaner

Throughout your life you install so many Programs and then Uninstall them. But these programs leave behind the registry keys like the breadcrumbs for Windows. The Windows reads or goes through these registry keys every time. So you therefore, need to cleanup these registries using a registry cleaner. It will not consume much of your time. Here is the Registry-script which will tweak some settings in Windows 8 Registry to make Windows faster. It will reduce timeout values, set Windows to automatically end not responding tasks, make menus to show faster upon clicking and tweak various other settings.
Windows Registry Editor Version 5.00
[HKEY_CURRENT_USERControl PanelDesktop]
“AutoEndTasks”=”1″
“HungAppTimeout”=”1000″
“MenuShowDelay”=”8″
“WaitToKillAppTimeout”=”2000″
“LowLevelHooksTimeout”=”1000″
[HKEY_CURRENT_USERControl PanelMouse]
“MouseHoverTime”=”8″
[HKEY_LOCAL_MACHINESYSTEMCurrentControlSetControl]
“WaitToKillServiceTimeout”=”2000″
Just copy and paste this in Notepad and save this as registryspeed.reg. Then Open this file and Click Yes when UAC dialog opens. After that again click Yes to install these settings.
Effects of this Tweak
  • End the tasks of the Applications or Apps which are not responding and taking much time to close by Windows Automatically
  • Decrease menus show delay time. After that When you click the menu, it will open faster.

4- Disable Animations and Increase Performance

Windows 8 comes with lots of candy features. It will show animation effects even while minimizing and maximizing a window or closing programs. These candy features might amaze you but they  You can disable these animation effects for tweaking your Windows 8.
  • Press Win + R
  • Type ‘Command’ and press Enter
  • Now type SystemPropertiesAdvanced and press Enter
  • You can view System properties with Advanced tab
  • Now click setting button in Performance section
  • Now you can see a performance Option Window
  •  You can uncheck boxes on animations that you don’t want to see or you can use ‘Adjust for best performance’
  • Click Ok
Note: Here is the list of animations which you need to disable.
  • Animate controls and elements inside windows
  • Animate windows when minimizing and maximizing
  • Animations in the taskbar
  • Fade or slide menus into view
  • Fade or slide Tool Tips into view
  • Fade out menu items after clicking
  • Save task bar thumbnail previews
  • Show shadows under mouse pointer
  • Show shadows under windows
  • Show translucent selection rectangle
  • Slide open combo boxes
  • Smooth-scroll list boxes

5- A Few More Things to Do to Make Windows 8 Faster

After following all above mentioned tweaks, you should be able to notice sufficient improvement in your system’s performance. Even though, apart from these steps, you should also do following things regularly:
  • Use Antivirus and keep it updated
  • Download and install latest updates using Windows Updates
  • Use latest drivers for your computer hardware
  • Install only necessary software’s

Conclusion

These are some tips which you may apply to speed up Windows 8 PC of yours. If you have any kind of question or confusion left then do let us know. I shall get back to your question as soon as possible. Furthermore, if you have found this guide helpful and worth reading then don’t forget to share this with your other friends and circle too. So, keep sharing this guide with others.

Saturday, 14 February 2015

How to protect Pendrive with Password-Bitdriver

How to keep Pasword for Pendrive?


Do you carry sensitive data  or any personal information in your pen drive?

Then you should  keep your pen drive safely.its better to keep a password for your pen drive.not only for pendrive in your PC and laptop you also share  personal information.if you want to keep the information secret you can assign Passwords for each partition  In this article we let you know how to keep a password for pendrive and system partitions.

BITLOCKER DRIVE ENCRYPTION is a inbuilt feature which was started in vista and it even continued in windows 8


Using bitlocker you can secure your removable disks(pen drive) , system partitions with a password.just follow these steps 
  • right click on the device , partition to which you want to enable bitlocker and click on turn on  bitlocker
bitlocker
step 1
  • type the desired password twice, your password must be at least of 8 characters 
bitlocker
step 2
  • In the next step click on start encryption 
bitlocker
step 3
  • Now you are almost done depending on the size of the drive this process may last for several minute . do not interrupt the process . INTERRUPTING OR REMOVING THE DRIVE MAY LEAD TO DATA LOSS OR HARDWARE FAILURE
bitlocker
step 4
  • Now your drive is secured with a  password 
bitlocker

How to remove bitlocker feature :

  • To remove bitlocker feature browse to Control PanelSystem and SecurityBitLocker Drive Encryption in your system and click on turn off bitlocker feature 
  • A decrypt wizard will run follow the steps
I hope this article is helpful for you.If you have any doubts feel free to comment below we will help you.


How to Speed Up Data Transfer On Pen-Drive

The process of transferring data on your Pen-Drive takes much time, when you are supposed to transfer a big file and that moment of wait really annoys us. Therefore, we are sharing another most awesome guide with you guys which will will be making you learn that, “How to Speed Up Data Transfer On Pen-Drive?”

So, you are supposed to follow this guide in order to speed up data Transfer. The data transfer from PC to Pen drive or from pen-drive to PC  depends on 3 main factors which are being elaborated below for you guys.

1- Type of files being Transferred

Music, Video and Office file will be transferred with a much higher rate compared to application files, you must have experienced this shift.

2- Aging of Pen-drive

This point is common for any device, older pendrives have a very slower rate of transfer. Since, after a long a span of time, it loses the

3- Port version of the USB

Nowadays almost every pen-drive is a USB 2.0 device when such USB is inserted in a old system which has a USB port version of 1.1 the data transfer will be drastically reduced.
Well the above 3 factors can not be controlled but there is a simple 3 step process which can give you the max out of your pen-drive.

Always Select NTFS File System

We can’t transfer larger files ( more than 4GB) if the pen drive is not in NTFS mode so right click on pendrive click on format and under file system select NTFS, it  is preferred to uncheck on quick format.
format in ntfs

Check For Disk ERoors

Under the properties tab of pen drive click on tools and then click on “check-now” button under error checking menu and start the scan to fix errors if any , depending on the size of pen drive it may take some time depending on the size on pendrive.
check for disk errors

Changing Device Policy

Under pen drive properties tab click on hardware select your USB device and click on Properties a new window should pop up in that window click on change Settings.
  • Now move on to the policies tab and check better performance and at least click on OK
Note: If you change the device policy and check on better performance then you must always eject your pen drive only after clicking on safely remove your USB option in task bar and it is always recommended to remove the pen drive from USB port wen it is not in use.
http://www.flipkart.com/mens-footwear/pr?p[]=facets.price_range%255B%255D%3DRs.%2B500%2B-%2BRs.%2B999&p[]=sort%3Dpopularity&sid=osp%2Ccil&offer=b%3Amp%3Ac%3A0103ed5210.&ref=5517f0ef-94a8-4547-b505-ead8c8be4dda

Thursday, 12 February 2015

How To Use Multiple Facebook Accounts At Same Time?

     In this post,  I will  show  you to log in into multiple user accounts at a same time. Mostly, web browsers  wont  support  to  log in into more than one user accounts. But many people
groldz.com-crome icon
has multiple accounts in social networking sites like Facebook, twitter, G+ etc. So, if they want to use multiple accounts at same time, they are using multiple browsers. Today, many of us seeking solution for this problem.
     Here, the solution for the problem is Chrome. Yes, the new version of Google Chrome have solution for this problem. Not only Facebook, you can use several user accounts in any web site like twitter, G+ etc. You just need separate Google accounts for each user account.
     That  is too much simple. Just go to chrome.com, then download and install Google Chrome in your system. Then follow the below steps.
  1. Go to Settings page.
  2. Scroll down and find “Add new user” button. (See Image 2)
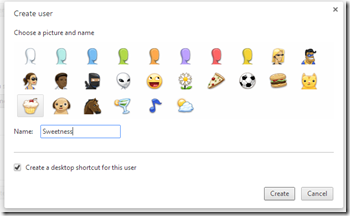
  3. Click the button.
  4. Give the name, you can choose your own icon, then click “Create”. You can create a desktop icon for the new user. (See Image 3)
  5. Then you can login to your Google account and other user accounts. You can create many users like this.
  6. You can switch between the users by clicking the right top corner. (See Image 4)
     Enjoy by using multiple Facebook, twitter and G+ accounts. Comment your needs and doubts.
Image 2


groldz.com - chrome add new user
Image 3
groldz.com-chrome switch between users
Image 4

Monday, 9 February 2015

Easily Create Your Own Start Button in Windows 8


For Windows 8, the Start Screen ticked off many people. Even though Microsoft restored the Start button in Windows 8.1, it is nothing more than a placeholder for the modern Start Screen. While there is a lot of third-party software, like Classic Shell, Start 8, etc., that can bring back the Start button, this software might hog your system resources (especially if you are using low memory systems) and sometimes they come bundled with crapware or adware, which is the last thing you want to install in your computer.
If you don’t want to install yet more software, here is a good trick for you to add a simple Start button option in your Windows 8 system. This will allow you to access all your installed programs without switching back and forth in a modern user interface.
Creating a custom toolbar for a start menu is very straightforward in Windows. First off, right click on the taskbar and select the option “Toolbars,” and then select “New Toolbar.”
start-menu-toolbar-new
The above action opens up the “New Toolbar” window. Here enter the below folder path and click on the “Select Folder” button. The below folder path represents the “All Programs” option in the Windows 7 start menu.
C:\ProgramData\Microsoft\Windows\Start Menu\Programs
start-menu-toolbar-programs-folder
As soon as you click on the “Select Folder” button, a new toolbar item named “Programs” will appear on the right hand side of the taskbar. You can access all your installed programs by clicking on the little arrow icon.
start-menu-toolbar-programs-toolbar
If you want to add the entire root folder of the start menu, then create a new toolbar, enter the folder path below and click on the “Select Folder” button.
C:\ProgramData\Microsoft\Windows\Start Menu\
start-menu-toolbar-start-menu-folder
From this point onward you can access any items in the start menu folder by clicking on that little arrow icon. If you want you can also add your own shortcuts to programs, files, and folders in the respective folder so that you can access them directly from either the start menu toolbar or the programs toolbar.
start-menu-toolbar-start-menu
If you ever want to remove the toolbars, right click on the taskbar, select “Toolbars” and then deselect the toolbar items you want to remove.
start-menu-toolbar-disable-toolbar
That’s it, you have successfully removed the custom toolbars from the taskbar. If you ever want to enable the toolbar again, you need to create it from scratch.
start-menu-toolbar-disabled
That’s all there is to do, and it is that easy to create new toolbars that can replace the start screen and provide a better and quicker access to your programs and other stuff. The good thing about the custom toolbars feature is that you can create a wide range of toolbars for a variety of needs. Sure, the toolbars don’t look as good as the regular Windows start menu, but it gets the job done, and there will be one less program in your system.
Hopefully that helps, and do comment below sharing your thoughts and experiences about using custom toolbars as a replacement for the start menu.

Canonical Launches First Ubuntu Phone With Spain's BQ

bq_aquaris_e45.jpgCanonical is all set to release its first Ubuntu-based smartphone in partnership with Spain's BQ, a company known for making ebook readers, smartphones and tablets in Europe. The smartphone, named Aquaris E4.5, has till date been available with Android 4.4 KitKat OS, and will now be released in a new version running Ubuntu OS for phones, which has previously also been called Ubuntu Touch OS. The smartphone is dubbed the BQ Aquaris E4.5 Ubuntu Edition.
The BQ Aquaris E4.5 Ubuntu Edition, as per Canonical, will be available across Europe in the 'coming weeks' through a flash sales system, which has proven to be successful for handset makers in India lately. The smartphone is priced at EUR 169.90 (roughly Rs. 12,000). Both Canonical and BQ have not yet mentioned the handset's availability details outside the European region as of now. As TheNextWeb notes however, the partnership with BQ is almost a year old, and the Spanish manufacturer, along with China's Meizu, did not stick to their original 2014 launch timeline. Not that BQ has announced its Ubuntu phone, we can expect a similar offering from Meizu soon.
The dual-SIM (Micro-SIM) supporting Aquaris E4.5 Ubuntu Edition has identical specifications to the original model except the software, which has now been changed from Android to Ubuntu. The smartphone features a 4.5-inch qHD (540x960 pixels) resolution display with pixel density of 240ppi. Powered by a quad-core MediaTek processor (Cortex-A7) clocked at 1.3GHz, the handset includes a Mali 400 GPU for handling the graphics, coupled with 1GB of RAM.
The smartphone also sports 8-megapixel rear camera with dual-LED flash and a BSI sensor, apart from a 5-megapixel front-facing camera for video chats. Both the cameras feature interpolation or picture-stitching technology that allows users to take 13-megapixel images with the rear camera, and 8-megapixel images with the front-facing camera. Featuring 8GB of inbuilt storage with microSD card expandability (up to 32GB card), the Aquaris E4.5 Ubuntu Edition also houses Wi-Fi 802.11 b/g/n, Bluetooth 4.0, 3G (HSPA+), GPS/ A-GPS, Micro-USB with OTG, and FM radio connectivity features.
ubuntu_for_phones_ui.jpgThe BQ Aquaris E4.5 Ubuntu Edition measures 137x67x9mm, weighs 123 grams, is backed by a 2150mAh Li-Po battery and will be available in Black colour variant only. Ubuntu is detailing its the edge interactions and Scopes features of its OS for smartphones. Users can access sections like music, video and social quickly with swipes from the home screen. The sections that show up feature the company's Scopes UI, which is claimed to be a 'reinvention' of the mobile UI. Scopes, or categorised home screens, provide a unified view of content in the particular category. The Ubuntu OS for phones run native apps or HTML5 apps. The company has tied up with major developers to ensure Facebook, Twitter, Dropbox, Evernote and Amazon apps are available at launch.
"The launch of the first Ubuntu smartphones is a significant milestone. The new experience we deliver for users, as well as the opportunities for differentiation for manufacturers and operators, are a compelling and much-needed change from what is available today. We're excited that a rising star like BQ has recognised this opportunity and is helping us make it a reality," stated Jane Silber, CEO of Canonical about the launch.
Canonical, with the BQ Aquaris E4.5 Ubuntu Edition, has made a move in the smartphone market after more than two years since its first showcase of Ubuntu Phone platform in January 2013. It is worth noting that the firm tried raising funds for its Ubuntu Edge smartphone in 2013 but failed to achieve the $32 million goal as the campaign closed with $20 million outstanding.

OnePlus One Available to Buy in India Without Invitation on Tuesday


 oneplus_one_black_rear.jpgOnePlus will for the first time on Tuesday offer the 'flagship killer' One smartphone without any invites in India. The company announced the news on Twitter.
The first open sale for the OnePlus One smartphone in India will kick off at 10am IST on Tuesday via Amazon India. The company announced the open sale to celebrate the completion of 10 weeks of OnePlus in India.
An open sale for the One smartphone means that consumers will not require any invite to purchase the handset during the sale. Despite announcing the reason for the sale, the firm's timing of the open sale is certainly not coincidental, with the similarly-specced and priced Xiaomi Mi 4 (Review | Images) becoming available in its first flash sale on the same day.
The company has not revealed the number of units that will be available to buy on Tuesday; though suggests that the handset will be available to purchase without invite till stocks last.
In a statement, Amazon India said, "The sale would be for limited quantity which is expected to stock out quickly given the high demand for the phone." To refresh, OnePlus had launched its flagship One smartphone in India at Rs. 21,999 for the 64GB version (Sandstone Black).
OnePlus in the past offered similar no-invitation offer during Christmas and Black Friday for the One smartphone in limited countries.
In January, OnePlus announced that it sold close to 1 million OnePlus One smartphones by the end of 2014 since the smartphone's launch in April last year. The company however did not reveal the exact numbers of the smartphone sold.
Earlier this month, OnePlus revealed the report card for its debut year - 2014. The annual report card detailed the company's shipments, regions where the smartphones were sold, total team strength, and more.
According to the company, OnePlus in 2014 sold 39 percent of its One smartphones in East Asia regions (including China, Taiwan, Hong Kong), followed by 32 percent, 22 percent and 7 percent in Europe (including Austria, Belgium, Denmark, Finland, France, Germany, Italy, the Netherlands, Portugal, Spain, Sweden, the UK), North America (including Canada and the USA) and India respectively.

Friday, 6 February 2015

Opera, FreeCharge Offer Free Internet to Idea and Vodafone Subscribers

opera_freecharge_webpass_official.jpg
Opera and FreeCharge have teamed up to offer free mobile Internet data for Vodafone and Idea subscribers using Opera Mini web browser.With the FreeCharge Sponsored Web Pass, users will be able to enjoy free Internet browsing for up to 5MB on Vodafone and up to 10MB on Idea network for one day. To get the free Internet access, Vodafone and Idea subscribers will need to open the Opera Mini browser, then go to the Speed Dial start screen and click Vodafone Internet Pass / Idea Web Pass to select Get Free Browsing by FreeCharge.
"At Opera, we always strive to create products and solutions that help more and more people experience the power of the internet. Opera Web Pass is a step towards getting more users online, by offering simple and convenient web access," said company in a press note.
The Opera Web Pass concept, which offers Internet data based on time, such as one hour or one day, or on content, such as access to a specific website with few clicks, was started by the company in 2013. Since then, Opera claims that it has distributed more than 35 million web-pass packages to users across 19 operators.
In November, Opera Software had unveiled the first beta version (only for Android) of its very-popular Opera Mini browser, enabling end-users to use upcoming features ahead of their general release. Then the company had also said that it is working on a subscription model for apps called the Opera Subscription Mobile Store. Notably, Opera Software released the beta version of its main browser back in March 2014, following in Google and Mozilla's footsteps.


Thursday, 5 February 2015

Lenovo’s iPhone 6 'clone' launched in India at Rs 19,900

Lenovo’s iPhone 6 'clone' launched in India at Rs 19,900
The phone is available in graphite grey colour and will ship starting February 6.
NEW DELHI: Lenovo has quietly launched Sisley S90, the iPhone 6 clone it had launched in China, in November 2014. The phone has been listed on the company's online store at Rs 19,900.

Offline retailers are also selling the phone as suggested by telecom retailer Mahesh Telecom.

The Sisley S90 looks blatantly similar to the iPhone 6 in design complete with rounded edges and metal body. The phone sports a 5-inch HD (720x1280p) Super AMOLED display.

Powered by a 1.2GHz quad-core Qualcomm Snapdragon 410 processor and 2GB RAM, the Sisley S90 comes with 32GB internal storage. It doesn't come with a microSD card slot.

The phone sports a 13MP rear camera with auto-focus and LED flash and a 8MP fixed-focus front camera with LED Flash for selfies and video chats. A 2300mAh battery powers the device.

In terms of connectivity, the dual-sim smartphone supports Wi-Fi 802.11 b/g/n, 3G, FDD LTE 4G (1800MHz), Bluetooth 4.0 and GPS.

The phone is available in graphite grey colour and will ship starting February 6.

The Best Free Antivirus Software for Windows

avast_antivirus_laptop_avast.jpgIf you have a Windows computer, you need anti-virus software. There always will be those who will insist that every virus attack is caused due to "user error" or because the person using the computer wasn't careful enough. That statement is only partly true. Even if you have all the latest Windows updates installed and are using the latest version of a secure browser, there are always some vulnerabilities can be used to attack your computer. Good anti-virus software stops you from downloading viruses or opening unsafe files. That's why it is essential to have anti-virus software installed and updated.
Many computer dealers will ask you to buy a licence for an anti-virus suite along with the PC, but free anti-virus software along with an anti-malware programme form a line of defence that's good enough for most people.
We looked at tests conducted by PC Mag and independent testing body AV-Test as a starting point and weighed them against our our own experiences to compile this list of the best free anti-virus software for Windows. Here are our picks:
Avast 2015 Free Antivirus
Avast is easy to understand, uses simple language to explain any problems, and has a great user interface that anyone can follow. It simplifies things like updating to the latest version and keeping the virus list up to date. Use silent mode to avoid the excessive announcements.
Download Avast 2015 Free Antivirus
Panda Free Antivirus 2015
Like Avast, Panda scored top marks for virus protection in AV-Test's report. Its interface is pretty but not as user friendly as that of Avast. It also has a nice feature called USB Vaccine - this prevents virus attacks that occur when you plug in an infected USB drive.
Download Panda Free Antivirus 2015
BitDefender Antivirus Free Edition
BitDefender's best feature is that it runs quietly in the background by default. It won't bother you until it spots an infection, unlike most other anti-virus software, which need a fair bit of tweaking to get them to stop popping up all the time.
Download BitDefender Antivirus Free Edition
bitdefender_screen.jpgIf your PC is already infected
The software mentioned above are great if you install them before your PC is infected. Once there's a virus attack, it can get tricky to get install these programmes especially if system functions have been hijacked by the virus. Anti-virus software can still help, but malware removal tools are more effective in cleaning up your computer once the infection has set in.
Malwarebytes Anti-Malware
Malwarebytes Anti-Malware is a very effective tool for getting rid of a virus that's already made its way into your system. It's not useful for protecting your PC from virus attacks as it doesn't offer realtime threat protection, but is excellent at cleaning up the mess.
Download Malwarebytes Anti-Malware
Comodo Cleaning Essentials 6
Malwarebytes was, in our experience, the best tool for malware removal, but it still requires you to install it on your infected PC. Installing software may not be possible in some heavily infected machines. In such cases, Comodo Cleaning Essentials 6 will be useful. You just need to unzip the file to use this set of virus cleanup tools. Comodo Cleaning Essentials 6 is portable software that runs without installation, making it useful in worst case scenarios.
Download Comodo Cleaning Essentials 6
Anti-virus software, along with a malware cleanup tool should be good enough for most users. You can pick any of the software listed above for protection against threats, and feel secure when using your computer, without having to pay a small fortune for the software.
Which is your favourite anti-virus software? Let us know via the comments.

Sunday, 1 February 2015

WhatsApp free calling feature now rolling out, may require Android Lollipop


It looks like WhatsApp is in the process of rolling out the much-awaited calling feature. According to a user at Reddit, he got the calling feature in his WhatsApp and he managed to make calls. The new feature also comes with a new user interface, which segregates calls, chats and contacts in three different tabs.
The Reddit users - Pradnesh07 - also showed screenshots of the updated app (posted above). He said that he was using the app APK, which is an install file for Android phones, available directly through the WhatsApp website and not the one downloaded from the Google Play store.
"It's like an invite thing, where a person with the call feature needs to 'call' another person who wants to start using the feature," wrote Pradnesh07 . "You need to get the APK from the website and not from the Play store."
For now it looks like WhatsApp is still testing the feature. Pradnesh07 wrote that he managed to call a few people in India but the feature doesn't work with all users. "I can't seem to send invites to other people, the only thing I can ensure is that it works in India for people running Lollipop 5.0.x on a Nexus 5. Other Indians without the earlier combo don't get it," he wrote.
The calls feature on WhatsApp will allow users to call their WhatsApp contacts using the internet connection. This means the calls will be free irrespective of where the users are. Users will have to only pay for the data charges, which are likely to be nominal.
This is similar to how other instant messaging apps like Skype and Viber allow users to make voice calls using internet.

However, given the scale of WhatsApp, the feature is likely to have far reaching consequences for both users and telecom industry. WhatsApp has over 500 million active users.